Instead of purchasing a new microphone for your computer, you can now use your iPhone as a wireless microphone by connecting it to your Mac. The latest version of macOS Ventura has this capability. You may enhance the quality of your microphone and utilise it for business without spending more money by using this approach.
System Requirements to Connect iPhone Mic
Users can now use the Continuity Camera feature with the macOS Mojave upgrade. The iPhone becomes a webcam as a result. This functionality has been modified in macOS Ventura by providing the option to use it without the video feed. To put it another way, your Mac can use the iPhone as a wired and wireless microphone. However, there are restrictions.
- You must use the same Apple ID to register both your Mac and iPhone.
- Turn on Wi-Fi and Bluetooth on your Mac and iPhone.
- Install iOS 16 or later and the Ventura update for macOS.
- By default, the Continuity Camera feature is activated. However, look it up in the phone’s settings.
- Connect your iPhone to your Mac to register it as a trusted device.
You do not need to use a certain feature in order to utilise this one. Everything is fine if both your Mac and iPhone are running iOS 16 and macOS Ventura. Additionally, your iPad can connect as a wired or wireless microphone if it is running iPadOS 16 or later.
How to Use the iPhone as a Mic for the Whole System
You must set your iPhone as your system-wide microphone if you wish to utilise it as the microphone for all apps and websites. This isn’t essential, but it does help you make sure everything is functioning properly. This is a simple procedure to follow, and it also helps because some of the default Mac apps only support microphones that are system-wide.
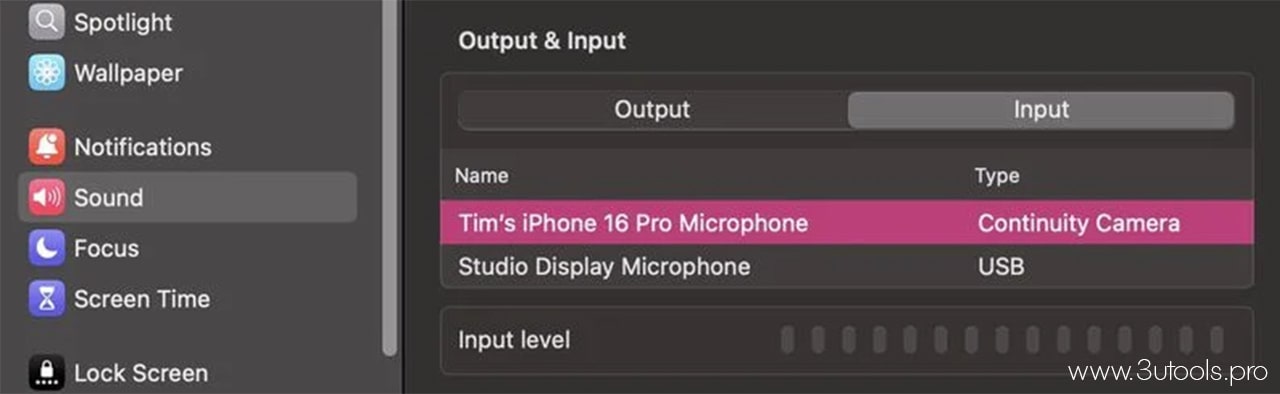
To begin, select the Sound tab from the system settings on your Mac. It is visible on the sidebar. There are two tabs under the Output & Input area. There is a tab for audio input and another for audio outputs. Selecting your iPhone in the audio input area adds it to the system-wide audio system.
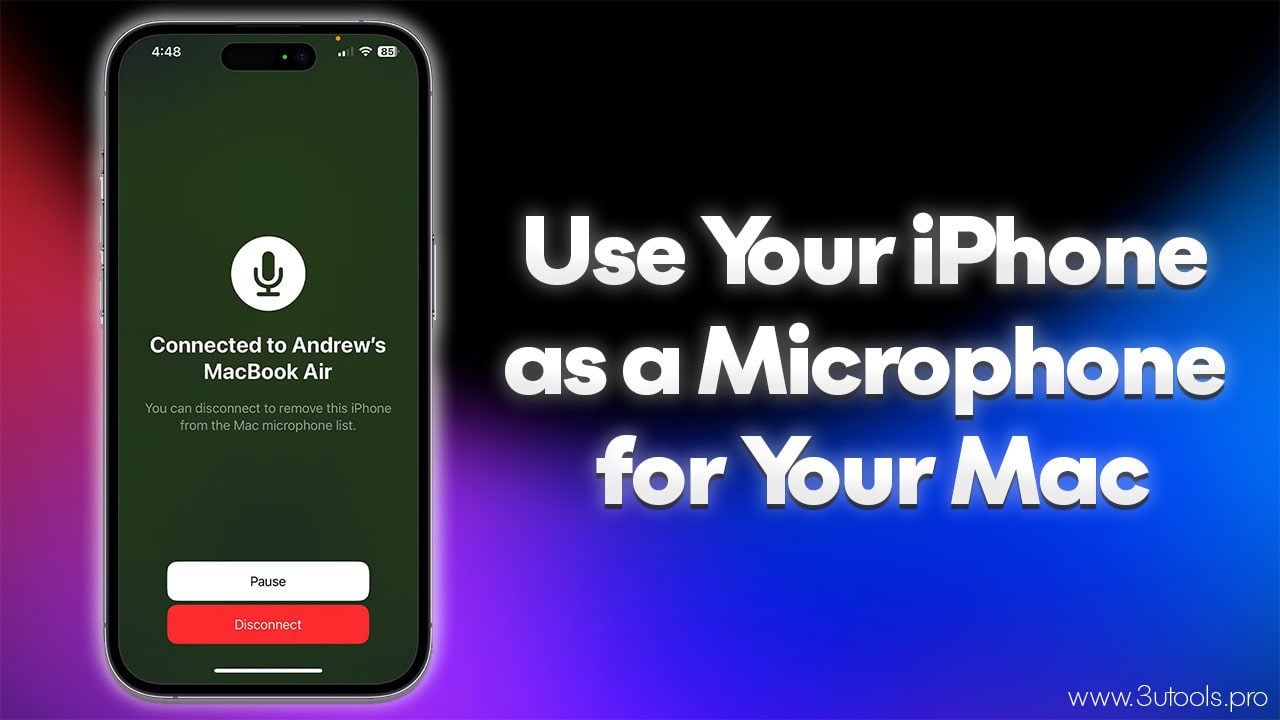
Following this, a dialogue box with Pause and Disconnect buttons shows up on the lock screen when you use the iPhone as a microphone. The Disconnect button will disconnect you entirely, as if you had unplugged the microphone, whereas the Stop button mutes the microphone’s audio.
Check your Mac’s input level meter when the iPhone conversation box appears. On the Sound options page, you can see it at the bottom. After that, you can observe the meter react to sound by speaking into your iPhone. Open Voice Memos on your Mac and record yourself to see how the sound sounds.
Choose the iPhone as the microphone for websites, apps, and games
Certain apps and websites still do not support your iPhone even if you have it configured as a system-wide microphone. You can then manually add it to each website and app if you’d like, or if you don’t want to configure it as a system-wide microphone. This is a quick and easy process for several websites, like as Zoom and Google Meet. However, this can be a little more difficult than typical for some video editors.
You can see the microphone and camera settings appear before you attend any meeting on browser-based websites like Meet or Zoom (if you join through a link). Click on Microphones here, then choose your iPhone from the drop-down box. When you log in again, the platform will use your iPhone as the microphone by default.
To use desktop video chat apps, such as Zoom, launch the application and simultaneously hit the command and comma keys (CMD+ and,). This will bring up your app’s settings. Navigate to the Audio and Sound area. Select your iPhone from the dropdown menu for microphones or audio input devices. The majority of video games are also compatible with this procedure. However, as each game is unique, you will need to learn how to find these steps if you are unable to find them.
How to Utilise a DAW or Video Editor
The iPhone must be used as a wireless microphone for video editing apps or a DAW by anyone who makes and edits videos. However, the majority of video editing programs, such as Premiere Pro, are incompatible with system-wide audio settings. Thus, this must be done by hand.
As before, open the app settings by simultaneously pressing the command and comma keys. Next, go to the audio settings and choose the iPhone as the input device under Microphone, Audio Input Devices, or Recordings.
Most of the time, these procedures work effectively with all editing programs. However, it is best to consult the user handbook and check it if you encounter any problems.